
Arizona Western College offers many of its courses through a variety of distance education delivery systems. At AWC, distance education means instruction that is (1) delivered to the learner regardless of time and/or geographical location, and (2) delivered via various non-traditional means.
Thursday, April 12, 2012


Wednesday, March 7, 2012
Blackboard Tip: Embed YouTube in Blackboard Updated
Embed YouTube Video in Blackboard.
• With your blackboard tab open –Click file new tab or press Ctrl T.

In the address bar type in www.youtube.com , you can search for the video you want to embed, for example, Arizona Western college

Click on the video link

Click Share-Click Embed

Select Use Old Embed Code , Select the code –right click and select copy .

Click on the blackboard tab. You can place your video in a content area called videos. Select the plus sign red button + on the upper left menu. Select ”Create Content Area
none;">
none;">
Enter name: For example, Videos. Select “available to users” check box. Click “Submit”
for example AWC From with the text editor select “toggle html source mode” <> button- from within html source right click and paste code copied from YouTube. Click “Submit”. Videos codes can be pasted also in the Discussion Board and Announcements areas.
Note: The YouTube iframe code is creating errors when pasted in blackboard. To embed an iframe turn the visual editor off- select html – Enter the name-paste code in editor-click submit.
Wednesday, January 4, 2012
Blackboard Tip: Beginning of the Semester Checklist
Following is a checklist we recommend for the beginning of the semester
Update the Syllabus
Check if information accurate when copying from last semester
Due dates are updated
Points system and assignments
Check Course Menu
Following helpful quick tips:
Make sure Edit Mode is ON. You may use the drag and drop feature to change the order of menu items. Course Menu items that do not contain any content are automatically hidden from student view but are visible to the instructor while in Edit Mode.
- In the upper right-hand corner, make sure Edit Mode is ON.
- To add a new link to the Course Menu, click the red “+” and select the area you want to add. Note: The “+” is unavailable when Edit Mode is turned off
- Rename, Hide or Delete links as necessary using the chevron (pull-down menu) next to each link. Note: If you remove a content area menu item, all information within that area is removed permanently.

- Organize your course menu using the drag and drop feature. For longer course menus you may want to consider creating Sub headers and Dividers by clicking on the “+” icon and selecting these features 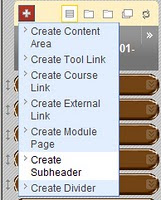

Improve course design and menu options From within the course control panel Click on Customization and then select Style where you can:

Choose a course menu style

Manage how the menu is displayed

Select Course Entry Point

Add/change the course banner

Note: On the Course Menu, you ca
Re-arrange the order of menu items by clicking on the double-headed arrow to the left of the menu item then dragging and dropping the item to its new position on the Course Menu Rename, show/hide, or delete a menu item by clicking on the action link (chevron) next to the item. Add a content area, a link to a course tool, a link to a course area, or an external link to the course menu by clicking on the Add (plus) symbol on the Course Menu


Chevron |

Add Content

Turn Off unnecessary tools
- Select Tools on the Course Menu.
- Click Hide Link next to the tools that you are not using.
To view the Tools that will be available to students, turn off the Edit Mode button
Create a Banner in PowerPoint
- Open a new PowerPoint presentation and select a Blank Content Layout.
- Click Design Page setup – Select Banner from Slides size for drop down menu
- Design your banner using WordArt, Text boxes, ClipArt or digital Photos.
- Save the Banner as a JPEG file.
- To upload the Banner into Blackboard, select Customization in the Control Panel area.
- Click on Style and scroll down to Select Banner, click Browse and Select the JPEG file of the Banner you created in PowerPoint and click Submit
Set Office Hours and Contact Information
Changing the course entry point
- From the Control Panel select Customization and Style.
- Change the Course Entry Point to Announcement
Make Course Available
- From the control Panel Select Customization and Properties in the Control Panel area.
- In the Set Availability, Make Course Available area select Yes and click Submit.
Post a Welcome Announcement
- Select Course Tools.
- Click Announcements link and Create Announcement.
- Fill in the Subject and Message fields and select the appropriate Options.
- Click Submit.
Send A Welcome Email
Send an email to your students once the course is made available. You may want to consider copying and pasting the Welcome Announcement into the body of the email.
- From the control Panel click Course Tools.
- Click Send Email.
- Select the Users.
- Type in a Subject and a Message and click Submit
Monday, December 5, 2011
Blackboard Tip: Suggestions for the End of the Semester
Following some suggestions for the end of the semester
· Make your courses unavailable
· Automatic Zero fill for grade book blank items
· Download your grade book
· Archive your course
Make your courses unavailable:
- From the Control Panel, click Customization and select Properties.
- Under the third option Set Availability, check the box next to No.
- Click Submit.


Automatic Zero fill for grade book blank items :
Click the chevron (two down arrows) near the weighted total column .
Select Edit Column Information

Select No for Calculate as Running Total.

Click Submit
Download course Grade Book:
- From within your grade center click Work Offline - select Download.


- On the Download Grades page under Data, select Full Grade Center, and under Options, keep the option section as default click submit .
Click the Download button and choose where to save the file.


The file will be saved with excel 2003 *.xls extension .
Archive your course
- From the Control Panel, click Packages and Utilities and select Export/Archive Course.


- Click Archive.


Note: Archive saves all elements of the course, which includes all student grades, tests, student activities and the course roster. Export saves all or parts of the course structure. Exporting does not include student activities or student roster.
- On the Archive Course page under Select Copy Options, select Include Grade Center History. - Click Submit.

Note: The archived course is saved in a zip and may take some time to be processed. An email will be sent when the process is completed.
- Click the Archive File link to download to your computer or click the chevron near the file name and select open .

Wednesday, October 26, 2011
Blackboard Tip: Self and Peer Assessment
Blackboard Self and Peer Assessment feature helps students evaluate their own work and the work of their classmates. Evaluation can be anonymous i.e. the student do not see the name of the classmate who submitted the work. Instructors provide questions, points possible are set by adding a criteria to each question. Following are the steps to create Self and Peer Assessment .
-With Edit Mode on , select the content area you want to place the assessment in. Click Evaluate – select Create Self and Peer Assessment
-With Edit Mode on , select the content area you want to place the assessment in. Click Evaluate – select Create Self and Peer Assessment

- Enter a name for the assessment in the Name field - Enter instructions- Enter the submission start date and submission end date- Enter the start date and end date for evaluations ( The evaluation start date needs to be after the submission end date).


-Click Yes to make the assessment available
- track the number of views, click Yes radio button
- Select the Display After and/or Display Until dates if necessary
- If necessary, set the date and time restrictions
- Click Submit.
Note: A column is created in the grade center for the assessment.
To Add a question click Create Question button

- Enter the question in the Question Text Editor
- Enter a model response in the Text Editor
- Click Submit

To Add Criteria to a Question:
- Click the drop down arrow to the right of the questions
- Select Criteria

- Click Create Criteria
- Enter criteria text in the Criteria Text Editor
- Assign points
- Determine if partial credit is allowed
- Select the Feedback to User settings
- Click Submit

When the evaluation is done you can move the grades assigned by students to the grade center by accessing the Peer Assessment through the Control Panel Course Tools- Self and Peer Assessment - click the chevron near the question and select view results . You are able to view, download and send results to the grade center.

Tuesday, May 17, 2011
Blackboard Tip: End of the Semester Checklist
Following some suggestions for the end of the semester
· Make your courses unavailable
· Download your gradebook
· Archive your course
Make your courses unavailable:
- From the Control Panel, click Customization and select Properties.
- Under the third option Set Availability, check the box next to No.
- Click Submit.

Download course Gradebook:
- From within your grade center click Work Offline - select Download.

- On the Download Grades page under Data, select Full Grade Center, and under Options, keep the option section as default click submit .
Click the Download button and choose where to save the file.


The file will be saved with excel 2003 *.xls extension .
Archive your course
- From the Control Panel, click Packages and Utilities and select Export/Archive Course.

- Click Archive.

Note: Archive saves all elements of the course, which includes all student grades, tests, student activities and the course roster. Export saves all or parts of the course structure. Exporting does not include student activities or student roster.
- On the Archive Course page under Select Copy Options, select Include Grade Center History. - Click Submit.


Note: The archived course is saved in a zip and may take some time to be processed. An email will be sent when the process is completed.
- Click the Archive File link to download to your computer or click the chevron near the file name and select open .

Tuesday, May 3, 2011
Blackboard Tip: Adding a Quick Comment to a Grade
Adding a comment is a way that you can give feedback to students on their performance . Following steps to add quick comment
· From within blackboard grade center rollover an entered grade
· Click the chevron near the grade (Note: in order to view the quick comment button, the cell needs to include a grade.)

· Select Quick Comment from the contextual menu
· Type in the Feedback to user box to share comments with students
· Type in the Grading Notes textbox for reference. The grading notes are only available to instructors and other users such as TAs who have access to the grade center.

· Click Submit
Subscribe to:
Posts (Atom)