Wednesday, November 26, 2014

Blackboard Tip : Latest Required Update to Grading Discussion Boards


With the latest required  update applied on AWC Blackboard , in the discussion board, the students names are no longer obviously list on the left bar . Following a quick tutorial  on  grading a discussion board

From the course left menu click Discussion Board


On the Discussion Board click the chevron drop down and select grade   


On the Grade Discussion Forum page., click Grade next to the student’s name


After reading the student posts, you can enter the grade on the left side , you can enter any feedback – Note:You can navigate to other submissions by clicking the gray box under the student name.  (This is a significant change due to the required update).


Sunday, November 2, 2014

Blackboard Tip: File Names in Blackboard


Using special characters in file names can lead to error in displaying items and accessing files in blackboard. Special Characters include:

    ~` # $ % ^& * ( ) = + / ? > < ;'[ ]: " { } \ | @

  Note:  If users add a period to the name other than the file extension, Anti virus  software thinks the file is infected.
    
Recommendation:  
 It is best to avoid using spaces in file names because different operating systems handle spaces in different ways. Instead, use underscore ( _ ) in place of spaces.  We noticed that some items in blackboard include the following special character: #

Not all web browsers and operating systems will recognize  #  when either uploading and/or downloading these files or opening an item, so it is best to avoid this .

          If you are going to require that students submit documents to you for homework assignments, projects, and exams, we recommend that you establish a naming convention that all students must adhere to, also add file types accepted for example docx, .doc or .rtf
etc. This will save you many hours of headaches of having to run down documents and assignments and misplaced files.
   

The following examples of naming  for documents , items and columns in blackboard .  


·         Document Naming:

-          Incorrect: Carol  assignment #3.doc
-          Correct: Carol_r_assgn3.doc


·         Grade Center Column Naming :

-           Incorrect: Wk #3 Writing  Assignment (15pts)
-          Correct: Wk_03_ReadAssign_15pts
    

Wednesday, October 29, 2014

Blackboard Tip: Recommendations for Large File sizes and Posting Multimedia files to Blackboard

Blackboard Tip: Recommendations for Large File sizes and Posting Multimedia files to Blackboard

Following are some recommendations that make movies, PowerPoint’s, images and PDF easier for students to view in Blackboard.  In order for students to have faster access, we recommend that instructors posting multimedia files to a web page or Blackboard course follow to these file size guidelines.
PowerPoint and office Documents Use the tools available in Microsoft Office to reduce file size for PowerPoint and Word files. You can also save files as PDFs before uploading, which often makes smaller, read-only versions of the files. Compressing images in documents will reduce the file size. 

In Word or PowerPoint Click File- Select Save AS

Click Tools – Compress pictures


Choose the screen or email 96 ppi value. Click OK


Also saving documents that have images in them in PDF format will reduce file size significantly – for example a PowerPoint that is 6.99 MB became 1.14 MB when converted to PDF  from word or PowerPoint click file –Save as

From Save as type drop menu choose PDF

Choose minimum size- Click Save

Images
Most images should only be around 60k-100k; Large images are okay when required (e.g., Art courses); the image size should be 500k or less. Two recommended formats are JPEG for photographs    and GIF for computer generated text images. Use a graphics program to resize images for screen viewing before uploading. You can also use an online service such as http://www.shrinkpictures.com or http://www.picresize.com
Video:
It is recommended to embed your videos or link rather than upload to blackboard. You can upload your videos to AWC video or YouTube and Vimeo, or a separate media server on campus and then link to them within a course. Be mindful of intellectual property rules. For example, it might not be legal to host a video from National Geographic on YouTube, even if you licensed it to use in a course.
Course Files— look for large file sizes and unused or duplicate files and folders that you can delete.
From Control panel click Files and click the course name


Select the check box near the content you want to delete

Click delete


    Audio - Use software to resample or trim audio files to reduce their size.  Audio files uploaded to Blackboard should be no larger than 4MB. Recommended format is MP3. The best way to post an audio file to Blackboard is to make it a Podcast episode - that way the player for the audio is shown right in Blackboard and the student does not have to download the audio before listening to it.

Tuesday, September 30, 2014

Blackboard Tip : Sections Combination (Hide Child Courses , Create Grade Center Smart Views)


Hide  Child Courses
     
-          With the new combination process, you may have realized that both the parent and child  
  courses are listed in blackboard . The child course is made unavailable by default and you can
   hide it from your view by doing the following steps:

  •       On the  AWCOnline  page, click the flower icon under My Courses box.


Uncheck the course name you want to hide – click submit


Sections & Smart Views
You can set up smart view in the grade center to see only users in a specific section

  •      From the Control Panel – Click Grade Center-"Full Grade Center"


  •      Click Manage -"Smart View"

  •   Click the "Create Smart View" box
  •     Enter Smart View Name
  •  Click users, Press Ctrl and select list of users to include in section

  • Click the star, the section will be listed under the Grade Center favorites in the Control Panel


Tuesday, August 19, 2014

Blackboard Tip: Beginning of the Semester Checklist


Checklist we recommend for the beginning of the semester:
  • Update the Syllabus
  • Check if information is accurate when copying from last semester (Attached Course Copy tutorial)
  • Due dates are updated
  • Points system and assignments
  • Check Course Menu
  • Make Your Course Available
Following helpful quick tips:
Make sure   Edit Mode button located in the upper right corner is ON. You may use the drag and drop feature to change the order of menu items. Course Menu items that do not contain any content are automatically hidden from student view but are visible to the instructor while Edit Mode is on.
-  To add a new link to the Course Menu, click the red “+” and select the area you want to add. Note: The “+” is unavailable when Edit Mode is turned off.
-  Rename, Hide or Delete links as necessary using the chevron (pull-down menu) next to each link. Note: If you remove a content area menu item, all information within that area is removed permanently.

-  Organize your course menu using the drag and drop feature. For longer course menus you may want to consider creating Sub headers and Dividers by clicking on the “+” icon and selecting these features


TURN OFF UNNECESSARY TOOLS
To simplify your class you may want to hide links of tools that you will not be using. If you decide to use a tool later in the semester you may make it available at that time.  From the left menu click Tools section, named Grades/Tools/Email


Improve course design and menu options: From within the course control panel Click on Customization and then select Teaching Style where you can:

Make your Course Available:
  • From the control panel click Customization-Properties
  • Under Set Availability (3)-Make course available –select yes


Tip:  In blackboard 9.1 you can use course to course navigation to jump from one place in a course to the exact same place in the other course. Click the chevron near the course name in top gray bar


Under My Other Courses section you want to go to.


Wednesday, June 4, 2014

Blackboard Tip: Deleting Duplicate and Unneeded Files in Blackboard


Following is a refresher on how to delete duplicate content from courses . We realized that several of the courses in the summer and fall sessions include duplicated content. We highly recommend deleting content that is no longer needed in blackboard. Also, content that has been duplicated (sometimes copied over several times) must be deleted.
Important Note: When files are deleted in a content area, they are only removed from that area but still remain in the course and located in the Files area. Following steps to delete unneeded or duplicated files. 
From the course control panel click the chevron (Two down arrows) located on the left of Files to load the Files page. If the course does not show up, click on “Basic Search” and “files” again and the course should show.


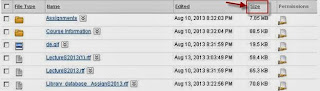
Click on the word Size twice to list the files and folders by the largest first


.


Note: Ensure that you have a backup copy of any files that you delete, should you need to upload them again.  You can download a copy of the files to your computer. Select the box to the left side of the file name or file type- click Download package. 


Look for files that have been deleted from a content area or files that are copied more than once.  These files are just taking up space in blackboard and need to be deleted. You can verify that they are not linked to any content areas.
1. Check   the box to the left side of the file name or folder you want to delete
2. Click on the Delete button.


A confirmation message will pop up indicating that the action is final and cannot be undone. If folders are selected to be deleted, all subfolders and files will also be deleted. Click OK
Note: If the files selected are not linked to any content areas, they will get deleted and you will be returned to the Files page. If the files selected are linked in the course, you will see a list of
the files and folders with Links. Click the 360° view link.
On 360ยบ View page, scroll down to the links to check information about the file links. If you see there is no "No links available" displayed under links information then it is safe to delete the file to free up space on blackboard.
 
For any questions or help in deleting please contact the Distance Education Department.

Thursday, May 22, 2014

Blackboard Tip: Beginning of the Semester Checklist

Checklist we recommend for the beginning of the semester:

Following helpful quick tips:
Make sure   Edit Mode button located in the upper right corner is ON. You may use the drag and drop feature to change the order of menu items. Course Menu items that do not contain any content are automatically hidden from student view but are visible to the instructor while Edit Mode is on.
-  To add a new link to the Course Menu, click the red “+” and select the area you want to add. Note: The “+” is unavailable when Edit Mode is turned off.
-  Rename, Hide or Delete links as necessary using the chevron (pull-down menu) next to each link. Note: If you remove a content area menu item, all information within that area is removed permanently.

-  Organize your course menu using the drag and drop feature. For longer course menus you may want to consider creating Sub headers and Dividers by clicking on the “+” icon and selecting these features


TURN OFF UNNECESSARY TOOLS
To simplify your class you may want to hide links of tools that you will not be using. If you decide to use a tool later in the semester you may make it available at that time.  From the left menu click Tools section, named Grades/Tools/Email


Improve course design and menu options: From within the course control panel Click on Customization and then select Teaching Style where you can:

Make your Course Available:
From the control panel click Customization-Properties
Under Set Availability (3)-Make course available –select yes


Tip:  In blackboard 9.1 you can use course to course navigation to jump from one place in a course to the exact same place in the other course. Click the chevron near the course name in top gray bar


Under My Other Courses section you want to go to.