Wednesday, January 12, 2011

Blackboard Tip: Beginning of the Semester Checklist

Time to get online courses ready for Spring semester. Following is a checklist we recommend

                Update the Syllabus
                Check if information accurate when copying from last semester
                Due dates are updated
                Points system and assignments
                Check Course Menu
Make sure   Edit Mode is  ON. You may use the drag and drop feature to change the order of menu items. Course Menu items that do not contain any content are automatically hidden from student view but are visible to the instructor while in Edit Mode.

-  In the upper right-hand corner, make sure Edit Mode is ON.
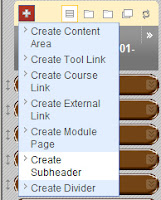
-  To add a new link to the Course Menu, click the red “+” and select the area you want to add. Note: The “+” is unavailable when Edit Mode is turned off
-  Rename, Hide or Delete links as necessary using the chevron (pull-down menu) next to each link. Note: If you remove a content area  menu item, all information within that area is removed permanently.


-  Organize your course menu using the drag and drop feature. For longer course menus you may want to consider creating  Sub headers and Dividers by clicking on the “+” icon and selecting these features

Turn Off unnecessary tools

-           Select Tools on the Course Menu.
-          Click Hide Link next to the tools that you are not using.
To view the Tools that will be available to students, turn off the Edit Mode button

Enhance your Course Design

Select Customization in the Control Panel area.
-           Click on Style and select Buttons or Text, choose the Default Menu View, and the Default Content View. You also have the option to change the Entry Point of the course and Upload a Banner.
You may also create a Banner very easily in PowerPoint.
-          Open a new PowerPoint presentation and select a Blank Content Layout.
-           Resize the slide 7 to 8 inches in width and 1.5 inches in height.
-           Design your banner using WordArt, Text boxes, ClipArt or digital Photos.
-           Save the Banner as a JPEG file.
-           To upload the Banner into Blackboard, select Customization in the Control Panel area.
-           Click on Style and scroll down to Select Banner, click Browse and Select the JPEG file of the Banner you created in PowerPoint and click Submit

Set Office Hours and Contact Information

Changing the course entry point
-          From the Control Panel  select Customization and Style.
-          Change the Course Entry Point to Announcement

Make Course Available
-          From the control Panel Select Customization and Properties in the Control Panel area.
-          In the Set Availability, Make Course Available area select Yes and click Submit.

Post a Welcome Announcement

-          Select Course Tools.
-           Click Announcements link and Create Announcement.
-           Fill in the Subject and Message fields and select the appropriate Options.
-           Click Submit.

Send A Welcome Email
  Send an email to your students once the course is made available. You may want to consider copying and pasting the Welcome Announcement into the body of the email.
-           From the control Panel click   Course Tools.
-           Click Send Email.
-           Select the Users.
-           Type in a Subject and a Message and click Submit


Tuesday, November 2, 2010

Blackboard Repository

Distance Education is planning on developing a Blackboard repository to use as a resource for building online courses or to enhance online courses. If you are interested in sharing content such as videos, pictures, banners, etc. that you have included in your online classes, please let Carol Rinehart know which course(s) and what you would like to share.

Wednesday, October 6, 2010

Blackboard Tip : Adding Instructor Contact Information

While instructor contact information is found in the syllabus , it is recommended to have a contact link in the blackboard menu . Contacts is a place where instructors can add profile information about themselves and others that is distributed to students. This is a good place to add office hours, phone numbers, and other links to help students identify people who have a role in the Course. Following are steps to add contact


  • Log into your course shell , ensure edit mode is on 

  • From the control panel- click course tools –select contacts

  • Click Create Contact. OR To edit a profile, click Edit from the contextual menu
  •  Enter Instructor information, for example, office hours and work phone number .
  •  You can upload a profile image. The size needs to be 150px by 150px. In the options section, click browse to attach an image from your computer. Click submit
 To Add the contact page to the menu

  • Click the Red Plus Sign – select Create Tool Link

  •  In the name field enter “Instructor Information” – from type drop down menu select Contacts –check the box “available to user” and then click submit

Tuesday, September 14, 2010

Blackboard Tip: Adding Multiple Files


Adding Multiple Files at Once:
An easy way   to upload multiple files to blackboard is to use the attach file button on the  text editor

          With “Edit Mode” On

          Click the content link on your course menu

          Click “Create Item “


          Enter the item “Name” and any optional text in the text editor box.


          On the third row on the text  editor click the Attach File button then click Browse


          Click “Submit”

          You may need to scroll to right to see the Submit  button.


          Click Submit
           To attach another file click the Attach File button, browse for the file , click “Submit” and then click “Submit” again


          In the option  permit users to view the content item select
Yes  
          Click “Submit”

          To see what the links look like from student point of view turn edit mode off .


Wednesday, August 18, 2010

Monday, August 16, 2010

BLOG TRAINING

Ernest Yates from the Distance Education department will have Blog training on Friday August 20 from 10am-noon at AC 282.  Training that will help you make your blog even more useful, plus training on basic usage will be covered.

In this session you will be adding rich features to your blog like the ones listed below:

1. Google Analytics -  gives you rich insights into your website traffic and marketing effectiveness. Powerful, flexible and easy-to-use features now let you see and analyze your traffic data in an entirely new way.

2. Apture - gives readers the power to search and explore rich content and media from the web without even leaving the page.

3. Snapshots - is the world's most popular way to give your users a more fun and interactive experience on your site or blog.

If you want to learn more about Prezi (http://www.prezi.com) let Ernest know and  he is ready to give a separate training for that.
Training Location and time:

Classroom AC 282 has been reserved for Friday, August 20 from 10am-noon
 

Check DE Multimedia For Classroom Blog