
Update the Syllabus
Check if information accurate when copying from last semester
Due dates are updated
Points system and assignments
Check Course Menu
Make sure Edit Mode is ON. You may use the drag and drop feature to change the order of menu items. Course Menu items that do not contain any content are automatically hidden from student view but are visible to the instructor while in Edit Mode.
- In the upper right-hand corner, make sure Edit Mode is ON.
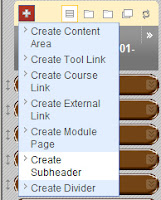
- To add a new link to the Course Menu, click the red “+” and select the area you want to add. Note: The “+” is unavailable when Edit Mode is turned off
- Rename, Hide or Delete links as necessary using the chevron (pull-down menu) next to each link. Note: If you remove a content area menu item, all information within that area is removed permanently.


- Organize your course menu using the drag and drop feature. For longer course menus you may want to consider creating Sub headers and Dividers by clicking on the “+” icon and selecting these features
Turn Off unnecessary tools
- Select Tools on the Course Menu.
- Click Hide Link next to the tools that you are not using.
To view the Tools that will be available to students, turn off the Edit Mode button
Enhance your Course Design
Select Customization in the Control Panel area.
- Click on Style and select Buttons or Text, choose the Default Menu View, and the Default Content View. You also have the option to change the Entry Point of the course and Upload a Banner.
You may also create a Banner very easily in PowerPoint.
- Open a new PowerPoint presentation and select a Blank Content Layout.
- Resize the slide 7 to 8 inches in width and 1.5 inches in height.
- Design your banner using WordArt, Text boxes, ClipArt or digital Photos.
- Save the Banner as a JPEG file.
- To upload the Banner into Blackboard, select Customization in the Control Panel area.
- Click on Style and scroll down to Select Banner, click Browse and Select the JPEG file of the Banner you created in PowerPoint and click Submit
Set Office Hours and Contact Information
Changing the course entry point
- From the Control Panel select Customization and Style.
- Change the Course Entry Point to Announcement
Make Course Available
- From the control Panel Select Customization and Properties in the Control Panel area.
- In the Set Availability, Make Course Available area select Yes and click Submit.
Post a Welcome Announcement
- Select Course Tools.
- Click Announcements link and Create Announcement.
- Fill in the Subject and Message fields and select the appropriate Options.
- Click Submit.
Send A Welcome Email
Send an email to your students once the course is made available. You may want to consider copying and pasting the Welcome Announcement into the body of the email.
- From the control Panel click Course Tools.
- Click Send Email.
- Select the Users.
- Type in a Subject and a Message and click Submit